How to create your own cloud-init alpine image for Proxmox
Recently I’ve converted one of my old PCs into a Proxmox server. In case you don’t know, Proxmox is essentially a virtual machines management environment. I didn’t really know if I’ll find it useful, just wanted to experiment a bit and maybe learn about terraform. Since then, I’m finding my virtual machines server quite useful. I can run my own small kubernetes cluster (k3s), docker registry, VPN gateway… all sorts of things. Basically, I can have whatever disposable infrastructure I want to test the technologies I’m interested in. So, as much as I encourage you to try Proxmox out as well, this won’t be the main topic of this post.
When creating a new VM, it’s useful to have a base image that will be populated with the user accounts (and their credentials) you want. I did that mostly with a VM templates which I just cloned but there’s a better way to do it - cloud-init.
Disclaimer
The big names in Linux world (Ubuntu, Debian, Arch, Alpine) all provide cloud-init enabled images which you should definitely use instead of preparing your own image. Additionally, these are certified and safe to use in the cloud. But again, it’s not the destination that matters but the journey so, with that in mind, let’s learn how to prepare a cloud-init enabled alpine image for proxmox.
Basic setup
I’ll be using alpine-3.18.4 standard X86_64 as my base image. Create a very basic VM (mine is 2G of RAM and 4G of disk space) - during creation, enable qemu-guest (not a requirement but a nice to have).
Boot up the machine and install alpine with setup-alpine script.
During setup:
- hostname - doesn’t matter, it’ll be changed by cloud-init,
- don’t add any additional users,
- enable ssh,
- disable root ssh login,
- format the drive as
lvmsys- it’s easier to customise the filesystem later on with LVM,
Reboot the system once the setup is complete.
Required packages
Log in back again (as root - since this is the only account existing at the moment).
Enable “community” repositories in /etc/apk/repositories and apk update.
Install the following packages first:
|
|
Enable qemu-guest-agent service.
|
|
Just to clarify util-linux provides a non BusyBox version of mount -
without it, cloud-init won’t be able to use the configuration image.
e2fsprogs-extra provides resize2fs which cloud-init requires as well.
Now, install cloud-init and py3-netifaces - the latter is a cloud-init’s
dependency but I guess there’s a bug in community maintained package which
omits that.
|
|
Now, configure sudo using visudo and uncomment rules for wheel
group.
As a last step configure /etc/cloud/cloud.cfg. Specifically
datasources_list, remove all sources but NoCloud.
Once you do that, it’s time to disable root password and perform cloud-init-setup. After that there’s no turning back! So, if there’s anything else you want to bake into the image do it now.
|
|
After you power off, don’t start the machine again!
Add cloud-init
cloud-init works by using a datasource. The simplest one is a data source
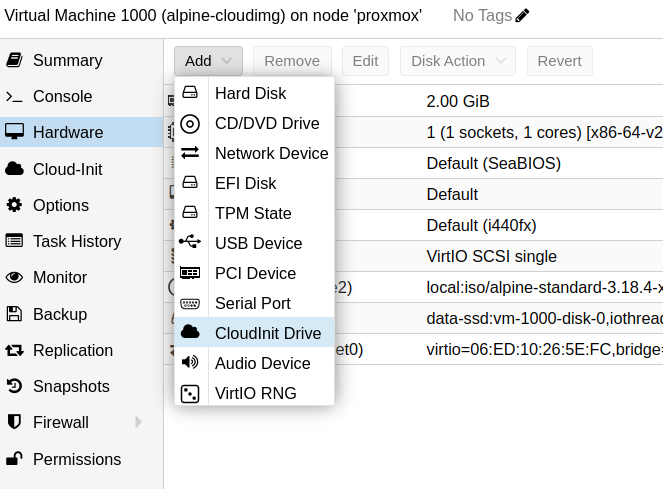
disc which proxmox will generate for us and attach to the machine. Add a new
hardware to the VM.

This will be our cloud-init CDROM. The type of the device
(IDE, SCSI) and its number doesn’t matter. cloud-init looks up the drive by
the filesystem label which must be set to CIDATA.
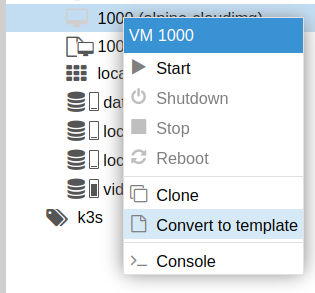
Once you do that, convert the VM to a template.

Using the template
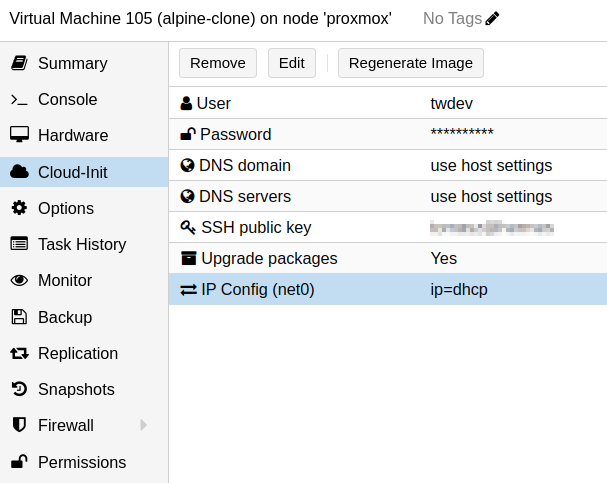
Having the above template, to provision a new bare bones machine, I just perform a full clone of the template and configure cloud-init details in proxmox.

Proxmox generates an iso9660 image containing the configuration. During first
boot, cloud-init service mounts that image, creates the user I specified and
performs basic machine setup.
So, once the machine is up and running I can login straight away with ssh
public key (sudo works out of the box as well):
|
|
Inspecting CIDATA disc image
In case you’re interested in the contents of the cloud-init configuration, it’s easy to inspect it:
|
|