Contents

Using SSL for services running in your home network

In this post I’m gonna discuss how to generate SSL certificates for services hosted within your home network. This can be anything, your plex or jellyfin instance or any development infrastructure you might be hosting locally. Keep on reading if you’re tired of HTTP and “untrusted website” warnings from your browser.

The plan

I’m gonna use navidrome as an example for the purpose of this post. It’s a music player typically running on port 4533.

Having to rely on an IP address and the port number is annoying so, first let’s come up with a name for the machine hosting the service - huginn.home.arpa. huginn.home.arpa is a raspberry pi running in my network that hosts the service.

I’m using home.arpa as this is recommended by rfc8375.

I recommend setting up a local DNS server to make things easier - this is out of scope of this post so, I’m gonna add huginn.home.arpa to my machine’s /etc/hosts to point to the mentioned raspberry pi (192.168.0.201).

1
2
3
4
5
6
7
...
127.0.0.1 localhost localhost.localdomain
127.0.0.1 localhost4 localhost4.localdomain4
::1 localhost6 localhost6.localdomain6

192.168.0.201 huginn.home.arpa
...

Good. Now huginn.home.arpa resolve to 192.168.0.201. This is still less than perfect as I need to use the port number explicitly: huginn.home.arpa:4533. I’ll need a reverse proxy to remedy that and forward directly to port 4533. You can run that reverse proxy wherever you want. To make things simpler let’s assume it runs on the same machine as navidrome itself. I’m gonna use nginx and the following configuration file under /etc/nginx/sites-enabled/huginn.home.arpa.conf.

 1
 2
 3
 4
 5
 6
 7
 8
 9
10
11
12
13
14
15
16
17
18
server {
        listen 80;

        server_name navidrome.home.arpa;

        location / {
                proxy_pass http://localhost:4533;

                proxy_set_header Host $host;
                proxy_set_header X-Real-IP $host;
                proxy_set_header  X-Real-IP       $host;
                proxy_set_header  X-ForwardedFor  $proxy_add_x_forwarded_for;
                proxy_hide_header X-Frame-Options;
                proxy_set_header  X-Frame-Options "SAMEORIGIN";

                proxy_read_timeout 60;
        }
}

With that in place, it’s possible to just use navidrome.home.arpa to access navidrome.

That works for plain old http, what about https?

The domain

During TLS handshake, an asymmetric cryptography is used employing server’s public and private key to establish a common secret that is going to be used for symmetric cryptography for the rest of the TLS connection. The client can verify the server’s credentials using its public key certificate as well. This is done using a certificate chain. Usually, a bundle of globally trusted certificate authorities is distributed with your operating system. Client, when inspecting the server’s public key certificate, tries to determine the certificate authority (CA) that signed its public key. If the CA is trusted then the server’s certificate is trustworthy and the connection is secure.

With that in mind, to be able to generate any keys and certificates for the domain, the domain itself has to be public. The way it’s obtained is out of scope here. You can buy a cheap domain on offer (usually with first 12 months free) or you can just use something like duckdns. The bottom line is that you have to be in control of the domain and be able to point its A and AAAA (optionally) records to your router’s IP.

For the purpose of this post, I’ve created twdevlab.duckdns.org on duckdns and pointed it to my router’s IP. This is temporary only and the domain doesn’t really have to point to any valid address once you’re done with certificate generation.

Port forwarding

I’ll be using certbot to generate my free letsencrypt keys and certificate. To be able to do that, I’ve forwarded port 80 and 443 on my router to 192.168.0.201 (the raspberry pi running both nginx reverse proxy and navidrome). Again, this is only temporary. In case you’re wondering, by the time you read this, the domain should already be parked to 1.2.3.4 and port forwarding on my router is turned off so… don’t bother :).

Let’s encrypt

SSL keys and certificates can be obtained automatically using certbot. First install it.

1
apt install -y certbot python3-certbot-nginx

Run certbot.

 1
 2
 3
 4
 5
 6
 7
 8
 9
10
11
12
13
# certbot --nginx -d twdevlab.duckdns.org
Saving debug log to /var/log/letsencrypt/letsencrypt.log
Requesting a certificate for twdevlab.duckdns.org

Successfully received certificate.
Certificate is saved at: /etc/letsencrypt/live/twdevlab.duckdns.org/fullchain.pem
Key is saved at:         /etc/letsencrypt/live/twdevlab.duckdns.org/privkey.pem
This certificate expires on 2024-03-11.
These files will be updated when the certificate renews.

Deploying certificate
Successfully deployed certificate for twdevlab.duckdns.org to /etc/nginx/http.d/default.conf
Congratulations! You have successfully enabled HTTPS on https://twdevlab.duckdns.org

We’ve got the certificate and the keys! Additionally, the default nginx server configuration has been updated to use it - this is what I wanted as I don’t like to add these entries manually.

Now, re-run certbot again like so.

 1
 2
 3
 4
 5
 6
 7
 8
 9
10
11
12
13
14
15
16
17
18
19
20
21
$ certbot certonly --manual -d '*.twdevlab.duckdns.org'
Requesting a certificate for *.twdevlab.duckdns.org

- - - - - - - - - - - - - - - - - - - - - - - - - - - - - - - - - - - - - - - -
Please deploy a DNS TXT record under the name:

_acme-challenge.twdevlab.duckdns.org.

with the following value:

wkx78-LP--LARpw0AHr2yzK-RiqRFkvbSSvHGFJ6KMg

Before continuing, verify the TXT record has been deployed. Depending on the DNS
provider, this may take some time, from a few seconds to multiple minutes. You can
check if it has finished deploying with aid of online tools, such as the Google
Admin Toolbox: https://toolbox.googleapps.com/apps/dig/#TXT/_acme-challenge.twdevlab.duckdns.org.
Look for one or more bolded line(s) below the line ';ANSWER'. It should show the
value(s) you've just added.

- - - - - - - - - - - - - - - - - - - - - - - - - - - - - - - - - - - - - - - -
Press Enter to Continue

I’m requesting a wildcard domain certificate here so, effectively, all subdomains of twdevlab.duckdns.org will be able to use https connections. This is great since I only need one certificate for the reverse proxy that I can reuse locally for as many services as I require.

But to make that work, certbot is requesting me to edit TXT record for my domain, to prove ownership. This varies wildly depending on the DNS provider you’re using for your domain. In case of duckdns, you have to visit a specific URL, as described in TXT Record API, to populate the TXT record.

Once that’s done, the only thing remaining is to update the reverse proxy configuration.

Reverse proxy configuration

certbot edits nginx’s default.conf. Let’s move huginn.home.arpa.conf to twdevlab.duckdns.org.conf and add some entries from default.conf to it. The file should like so.

 1
 2
 3
 4
 5
 6
 7
 8
 9
10
11
12
13
14
15
16
17
18
19
20
21
22
23
server {
        listen 443 ssl; # managed by Certbot

        ssl_certificate /etc/letsencrypt/live/twdevlab.duckdns.org/fullchain.pem; # managed by Certbot
        ssl_certificate_key /etc/letsencrypt/live/twdevlab.duckdns.org/privkey.pem; # managed by Certbot
        include /etc/letsencrypt/options-ssl-nginx.conf; # managed by Certbot
        ssl_dhparam /etc/letsencrypt/ssl-dhparams.pem; # managed by Certbot

        server_name navidrome.twdevlab.duckdns.org; # managed by Certbot

        location / {
                proxy_pass http://localhost:4533;

                proxy_set_header Host $host;
                proxy_set_header X-Real-IP $host;
                proxy_set_header  X-Real-IP       $host;
                proxy_set_header  X-ForwardedFor  $proxy_add_x_forwarded_for;
                proxy_hide_header X-Frame-Options;
                proxy_set_header  X-Frame-Options "SAMEORIGIN";

                proxy_read_timeout 60;
        }
}

Additionally, since there’s no local DNS in place, I’m gonna add navidrome.twdevlab.duckdns.org to my /etc/hosts:

1
2
3
...

192.168.0.201 navidrome.twdevlab.duckdns.org

It’s now possible to test this configuration, like so.

 1
 2
 3
 4
 5
 6
 7
 8
 9
10
11
12
13
14
15
16
17
18
19
20
21
22
23
24
25
26
27
28
29
30
31
32
33
34
35
36
37
38
39
40
41
42
43
44
45
46
47
48
49
50
51
52
53
54
55
56
57
58
$ curl -v -k https://navidrome.twdevlab.duckdns.org
*   Trying 192.168.0.201:443...
* Connected to navidrome.twdevlab.duckdns.org (192.168.0.201) port 443 (#0)
* ALPN, offering h2
* ALPN, offering http/1.1
* TLSv1.0 (OUT), TLS header, Certificate Status (22):
* TLSv1.3 (OUT), TLS handshake, Client hello (1):
* TLSv1.2 (IN), TLS header, Certificate Status (22):
* TLSv1.3 (IN), TLS handshake, Server hello (2):
* TLSv1.2 (IN), TLS header, Finished (20):
* TLSv1.2 (IN), TLS header, Supplemental data (23):
* TLSv1.3 (IN), TLS handshake, Encrypted Extensions (8):
* TLSv1.2 (IN), TLS header, Supplemental data (23):
* TLSv1.3 (IN), TLS handshake, Certificate (11):
* TLSv1.2 (IN), TLS header, Supplemental data (23):
* TLSv1.3 (IN), TLS handshake, CERT verify (15):
* TLSv1.2 (IN), TLS header, Supplemental data (23):
* TLSv1.3 (IN), TLS handshake, Finished (20):
* TLSv1.2 (OUT), TLS header, Finished (20):
* TLSv1.3 (OUT), TLS change cipher, Change cipher spec (1):
* TLSv1.2 (OUT), TLS header, Supplemental data (23):
* TLSv1.3 (OUT), TLS handshake, Finished (20):
* SSL connection using TLSv1.3 / TLS_AES_256_GCM_SHA384
* ALPN, server accepted to use http/1.1
* Server certificate:
*  subject: CN=*.twdevlab.duckdns.org
*  start date: Dec 13 10:35:23 2023 GMT
*  expire date: Mar 12 10:35:22 2024 GMT
*  issuer: C=US; O=Let's Encrypt; CN=R3
*  SSL certificate verify result: unable to get local issuer certificate (20), continuing anyway.
* TLSv1.2 (OUT), TLS header, Supplemental data (23):
> GET / HTTP/1.1
> Host: navidrome.twdevlab.duckdns.org
> User-Agent: curl/7.81.0
> Accept: */*
> 
* TLSv1.2 (IN), TLS header, Supplemental data (23):
* TLSv1.3 (IN), TLS handshake, Newsession Ticket (4):
* TLSv1.2 (IN), TLS header, Supplemental data (23):
* TLSv1.3 (IN), TLS handshake, Newsession Ticket (4):
* old SSL session ID is stale, removing
* TLSv1.2 (IN), TLS header, Supplemental data (23):
* Mark bundle as not supporting multiuse
< HTTP/1.1 302 Found
< Server: nginx
< Date: Wed, 13 Dec 2023 11:58:58 GMT
< Content-Type: text/html; charset=utf-8
< Content-Length: 28
< Connection: keep-alive
< Location: /app/
< Permissions-Policy: autoplay=(), camera=(), microphone=(), usb=()
< Referrer-Policy: same-origin
< Vary: Origin
< X-Content-Type-Options: nosniff
< 
<a href="/app/">Found</a>.

* Connection #0 to host navidrome.twdevlab.duckdns.org left intact

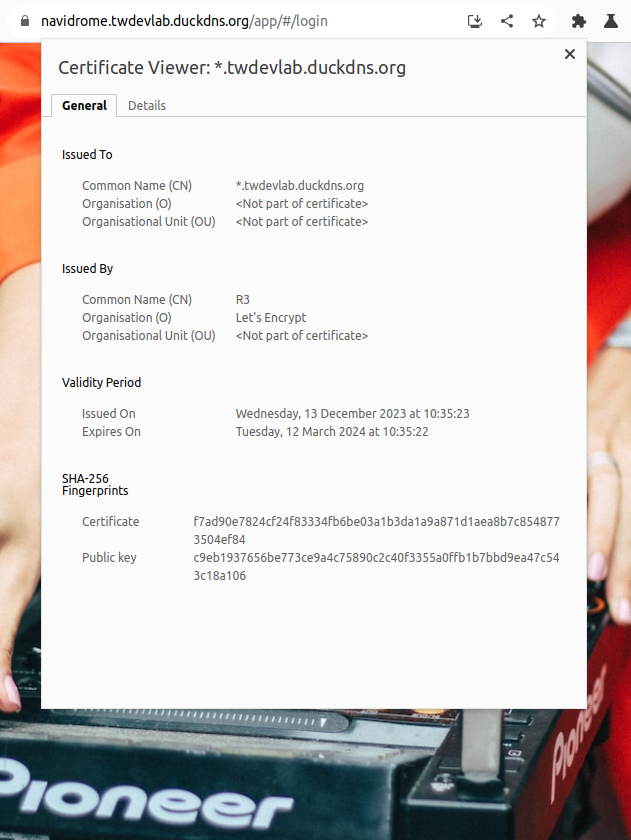
Visiting navidrome.twdevlab.duckdns.org will yield a working https connection with a valid public key certificate.
/images/navidrome.png

Next steps

I can now have subdomains for all my LAN services like proxmox.twdevlab.duckdns.org, portainer.twdevlab.duckdns.org and so on. With the generated wildcard certificate all of that will work with TLS, which is terminated on the reverse proxy.

Use local DNS

For the purpose of this post I’ve used /etc/hosts file to resolve the subdomains locally but, in the long run, this is simply not gonna work as such configuration would have to be duplicated on all hosts.

In my network, I’m using pihole as my local DNS - this is advertised by my DHCP server to all my clients. Local DNS server becomes a necessity once the number of devices grows within the network. This is something everyone should consider, especially, when managing subdomains for wildcard SSL certificates.